ROBBiE Manual
Table of Contents
What is ROBBiE?⌗
ROBBiE is an audio routing plugin based on the power of sequential switches from the world of modular synthesizers. Utilize independant left and right routing from eight I/O slots, with seven traversal modes to travel through them. Route audio in sync with your music, or freely with ROBBiE’s internal clocks. Use Midi mode for fine grained creative control over the routing system.

ROBBiE’s Story⌗
Sometime around the turn of the 20th century, a matchbook size robot landed on Earth, in a remote area known simply as “Indiana”. It was on an exploratory mission, as word was getting around the milky way that the dominant species on this planet was getting rather clever, and inventing all kinds of interesting technology at a rapid pace. This diminutive automaton had come from a larger galactic robot society, who were naturally interested in documenting and cataloging every manner of technology they might get their tiny mechanical hands on. It is to this end that ROBBiE was sent to the Earth.
Initially, ROBBiE wandered from place to place, documenting cotton gins, water wheels, pocket watches, and so on. After a few years however, he made a wonderful chance discovery! He had hitched a ride on the back of a young woman’s skirt, somewhere outside Cleveland. Little did he know, she was headed into her day job as a telephone switch operator. It was here he found his true passion, wires and cables, audio going from here to there, just begging to be routed, patched, arranged in combinations yet untried. One thing led to another, and ROBBiE managed to befriend this young woman, and with her help, he quickly learned to operate the switchboard. He spent countless hours at that board, routing phone calls around the city, the country, and the world. Progress however marched on, and before he knew it, the manual switchboard had been replaced with an electromechanical one, and ROBBiE was out of work. (ROBBiE himself is electromechanical, but that’s neither here nor there). Having been unceremoniously sacked, ROBBiE decided he would just wait it out until that time might come when he could switch glorious signals again. That time is here! ROBBiE, welcome back! ROBBiE is newly employed, here to route signals around your DAW at will.
Installation⌗
macOS⌗
- Double click the installer (ROBBiE.pkg)
- Click Continue / Install until ROBBiE is installed! (The option to install to a custom location will be provided in the installer.)
Windows⌗
- Double click the installer (ROBBiE.exe)
- Click “Yes” when prompted to give permissions to make changes on your device.
- Click Next/Yes/Install until ROBBiE is installed! (The option to change the default install locations will be provided in the installer.)
Authorization⌗
Unathorized plugins are loaded in Demo Mode. Audio will stop after 10 minutes, and plugin state will not save.
Authorization keys can be purchased on Gumroad:
To authorize:
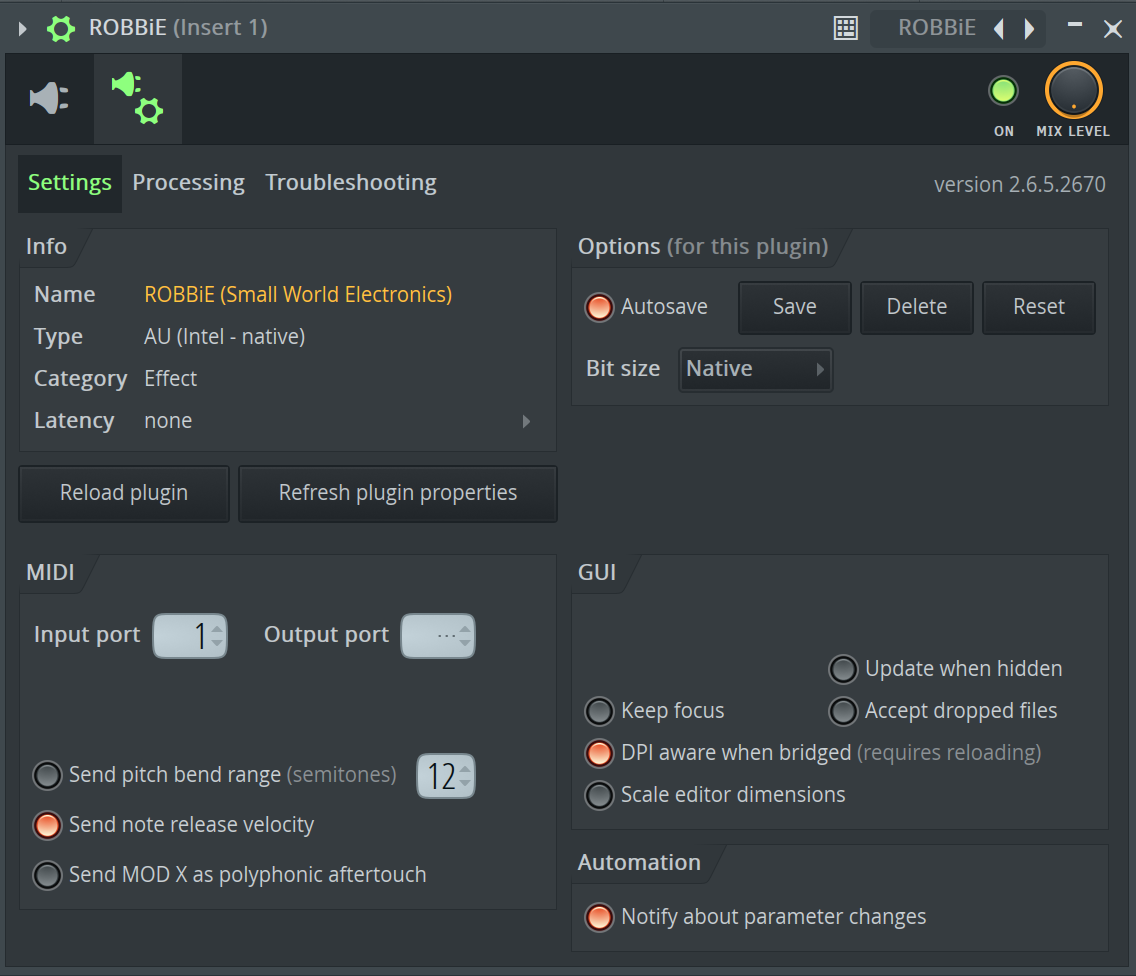
- Click the gear in ROBBiE’s top right corner.
- Enter your authorization code emailed to you from Gumroad, and press
Submit. - You should get the message
Successfully Authorized!. - ROBBiE will be automatically authorized on every subsequent startup.
Uninstall⌗
macOS⌗
- Go to your install location (this is usually
/Library/Application Support/Audio/Plug-Ins). - The Components folder to delete AU, and the VST3 folder to delete VST3.
- Delete ROBBiE.component or ROBBiE.vst3 to delete the AU and VST3 versions respectively.
Windows⌗
- Search for “Uninstall a program” in the Windows menu, and launch it.
- Find ROBBiE in the list of programs and right click it.
- Choose “Uninstall” from the list of options, and follow the prompts.
Controls⌗
For help setting up ROBBiE in your DAW, please refer to the DAW Setup section of this manual.
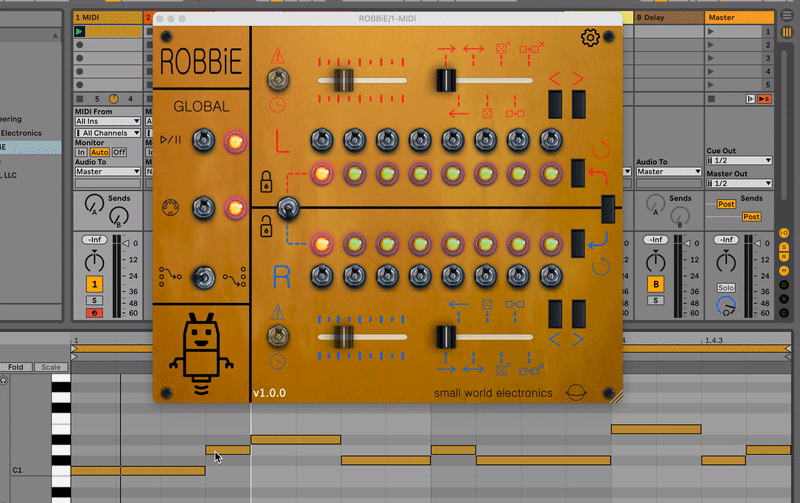
Global⌗
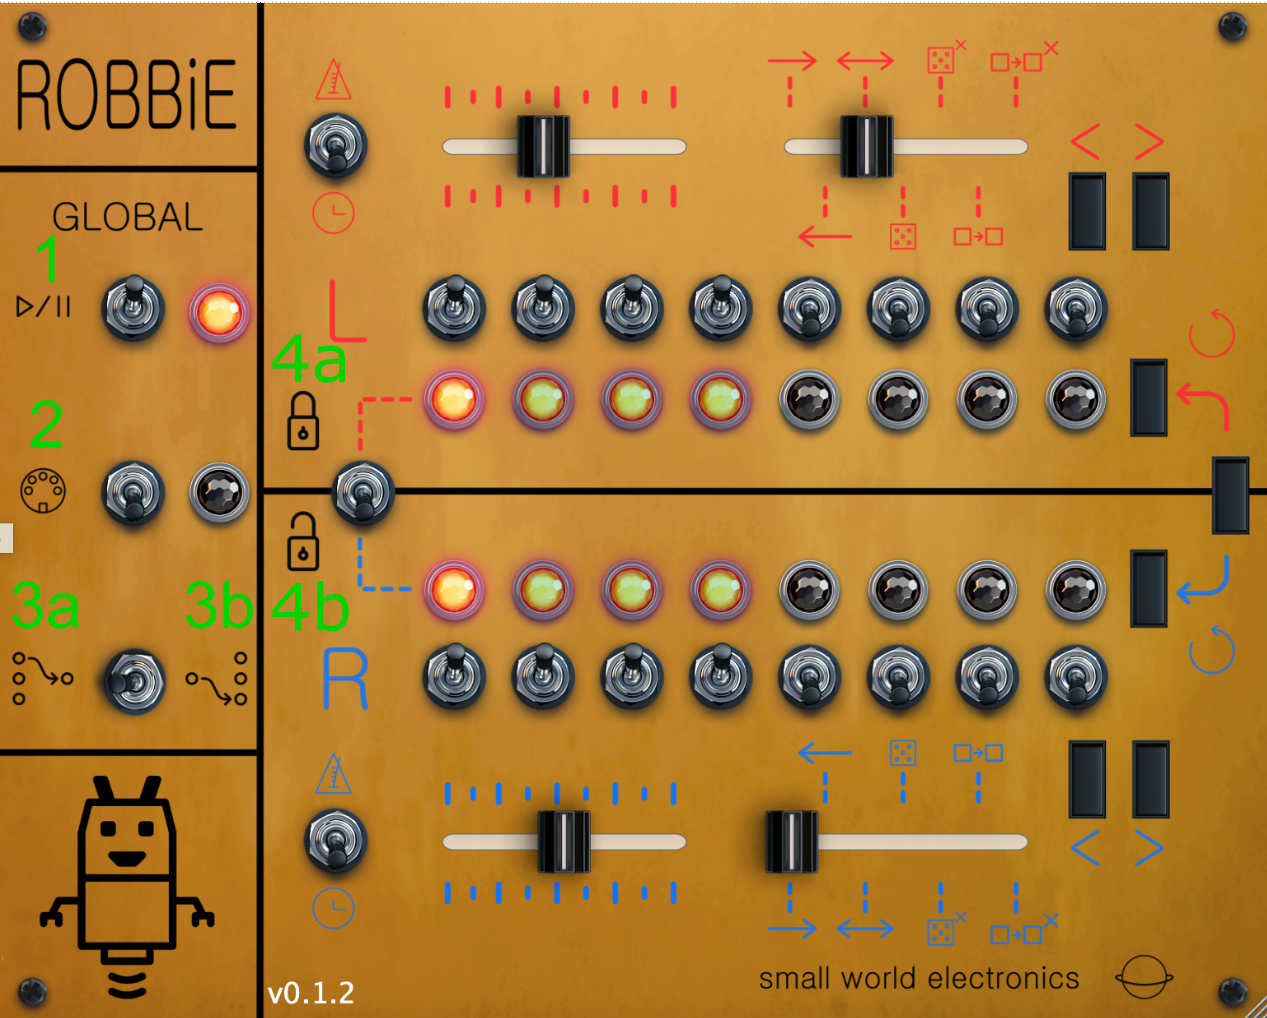
- Play / Pause: If the light is lit, ROBBiE is playing. (Note: In DAW Sync mode, ROBBiE will not play if the DAW is paused.) (Note: In Midi mode, ROBBiE will not play without Midi input.)
- Midi: Turn this on to enable midi mode. If the light is lit, midi mode is activated. (Note: See Midi Mode)
- Many to One / One to Many:
a. Many to One: multiple inputs are routed to one output.
b. One to Many: one input is routed to many outputs. - Channel Sync: Locks / unlocks the left and right channels.
a. Locked: Locks the right channel to the left. In this mode the right channel’s controls do nothing, it simply follows the same routing as the left channel. The right channel’s controls will become disabled.
(The signal is still stereo.)
b. Unlocked: The left and right channels are routed independantly.
Step toggles⌗
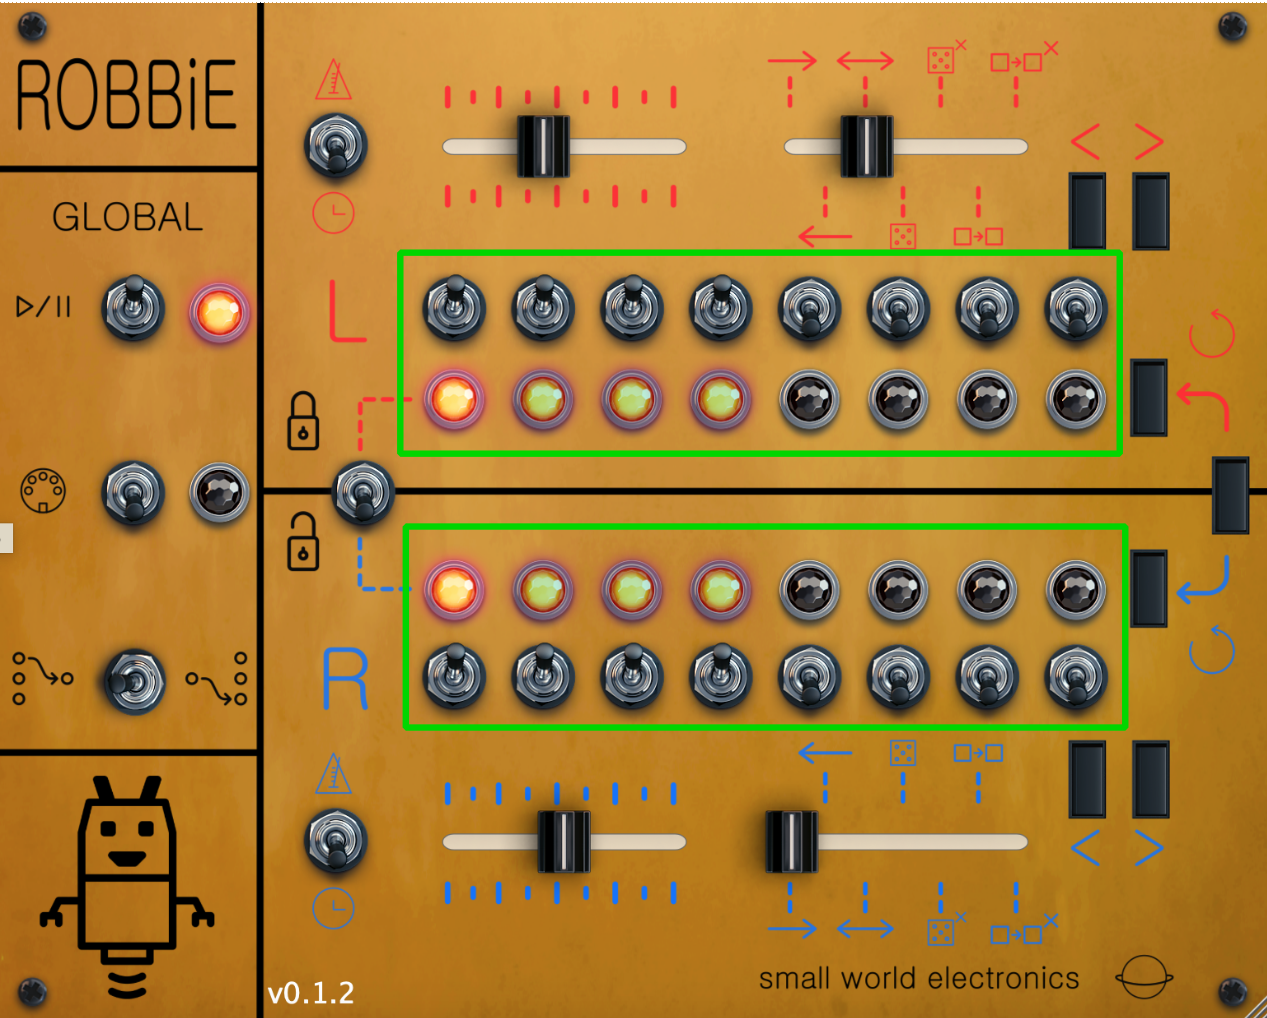
Each channel has a set of eight toggles with corresponding lights. These map to ROBBiE’s eight available inputs / outputs. Turning a toggle to the up position means that channel is now enabled, and it can be jumped to during the sequence. Turning the toggle to the down position means that channel will be ignored and skipped during the sequence. An up toggle will dimly light the LED. A channel’s LED will light brightly when it is selected.
Channels⌗
The left and right channels each have a set of identical controls.
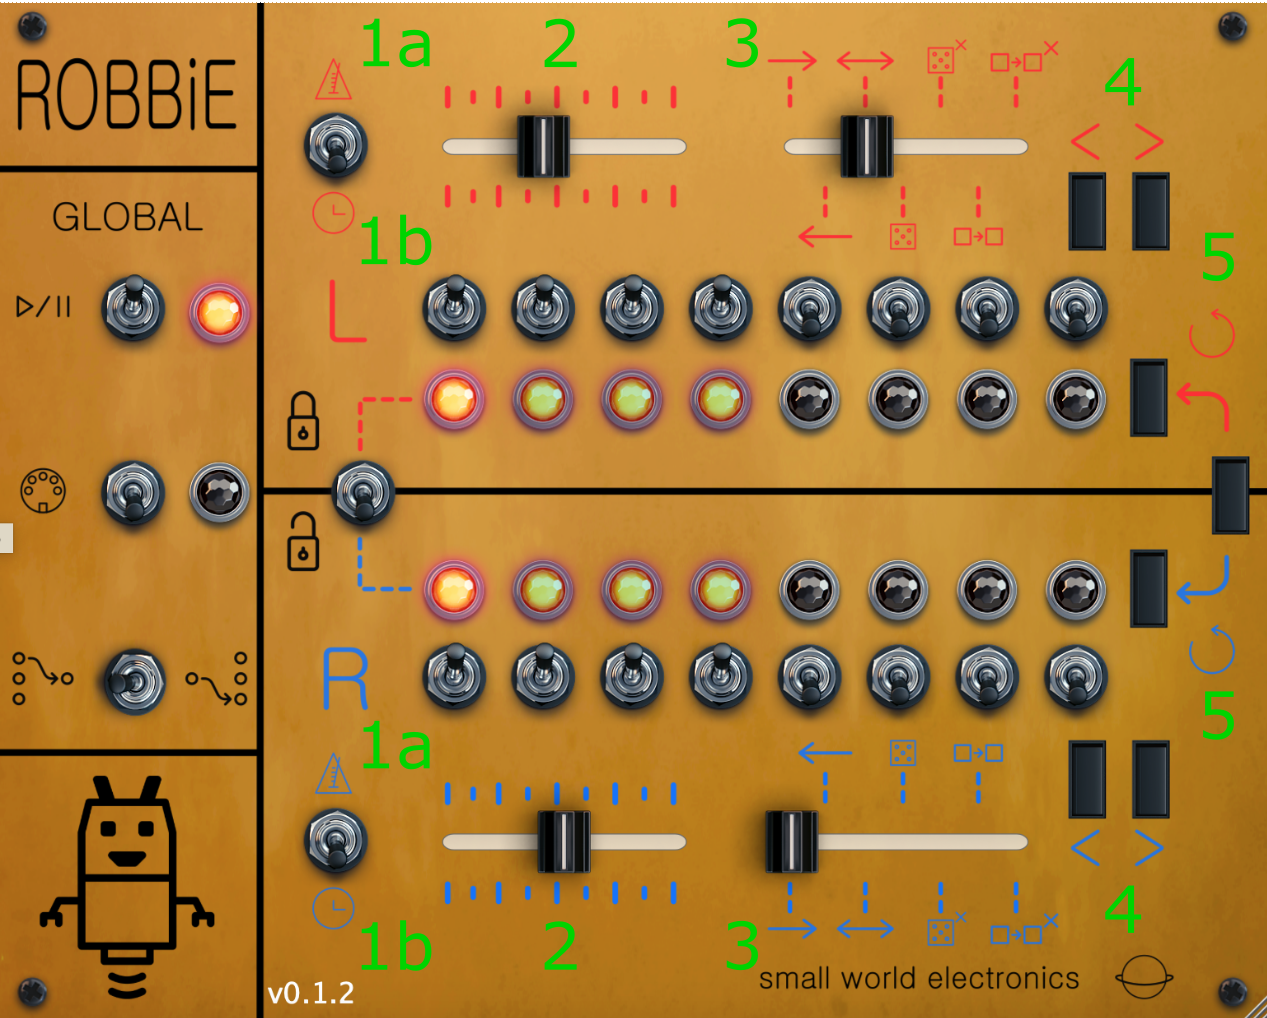
- Free / DAW Sync:
a. In the upper position, the channel is synced to the DAW.
b. In the lower position, the channel is synced to the internal clock. The internal clock can go from less than 1Hz, all the way up to audio rate. (The audio rate portion creates a sample rate reduction type effect.) - Rate: Control channel’s speed.
a. In DAW Sync mode this is in subdivisions of the DAW Clock. i.e. (1 bar, 1/2 note, etc.)
b. In Free mode this is in Hz (ticks per second). - Traversal: Controls how we travel through the set of active channels.
- Forwards: First to last, in order
- Backwards: Last to first, in order
- Ping pong: First to last, then last to first.
- Random: Picks a random channel on each tick. It is possible to pick the channel that is already active, and therefore not move.
- Random, no repeats: Picks a random channel on each tick. It is not possible to pick the active channel, so you will always move on every tick.
- Sequence: A random sequence of positions. Repeats are allowed, so you may not hit every enabled position. The sequence may also have the same position multiple times in a row, and therefore not move on a tick. The sequence can be regenerated by hitting the reset button. The sequence is also regenerated when switching traversal modes, or when enabling or disabling steps. The sequence length is the number of currently enabled steps.
- Sequence, no repeats: A random sequence of positions. Repeats are not allowed, so you will visit every enabled position once before going back to the beginning. The sequence can be regenerated by hitting the reset button. The sequence is also regenerated when switching traversal modes, or when enabling or disabling steps. The sequence length is the number of currently enabled steps.
- Increment / Decrement: Move right / left through the enabled steps. This behavior is the same regardless of traversal mode. It is can be useful to pause ROBBiE and use these buttons to listen to the signals on each of the steps.
- Reset: Sends the channel back to its “first” enabled step. This differs based on the traversal mode. For reverse it’s the last step. For random modes, this selects a new random step. For sequence modes this generates a new sequence. There is also a center reset button to reset both channels at the same time.
Midi Mode⌗
We have two main ways of using midi to control ROBBiE.
-
Increment Control: Every time we send a midi note here, it clocks ROBBiE. This obeys the traversal mode, so if you’re in forwards, the sequence will go forwards, if it’s random mode, it’ll go to a random step, and so on. We can use C0 to increment both channels, D0 to increment only the left, and E0 to increment only the right.
-
Manual Control: Sets the active channel manually. The notes on the keyboard are mapped to the steps of the sequence, and playing one will immediately jump to that step. This mode ignores the traversal setting. We use notes C1-A1 (chromatic) to set both channels at once, C2-A2 to set just the left channel, and C3-A3 to set just the right channel.
Rate controls are disabled in Midi Mode.
Getting Fancy with It⌗
Using multiple instances of ROBBiE, we can go really crazy with the routing. For example, we can use two instances, one in Many to One mode, and the other in One to Many mode, to send one of many inputs to one of many outputs. This can get really wild!
DAW Setup⌗
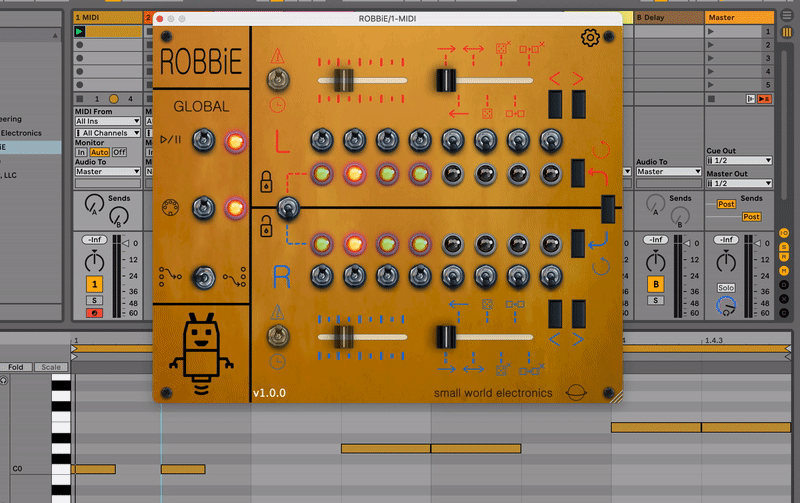
ROBBiE is a multi-bus plugin, meaning it supports multiple channels in and out. This can be a bit weird to set up in some DAWs, so we have provided some documentation here to help with that process.
In addition, if we want to use midi mode, we often have to route midi to ROBBiE as well.
Ableton⌗
Many to One Mode⌗
In Many to One mode, place ROBBiE on an audio track. Audio from other tracks can be routed into ROBBiE by setting Audio TO to the track ROBBiE is on, and then selecting one of the eight inputs from the list in the second box. (Input #1 will appear as Track In). Make sure to set the track ROBBiE is on to Auto, and arm recording. (You may have to disable Exclusive Arm under Preferences > Record)
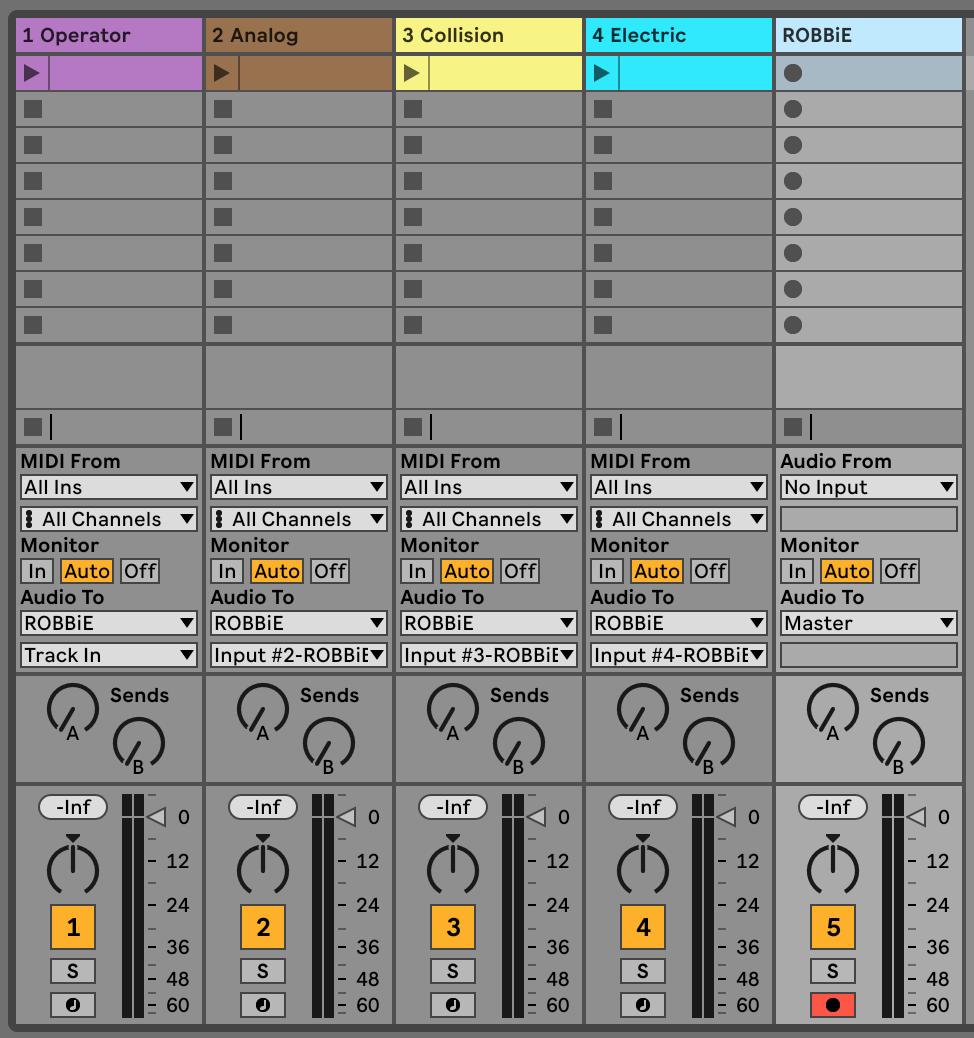
One to Many Mode⌗
In One to Many mode, ROBBiE will take audio from the track it is on. This can be a midi track, or an audio track. Output #1 will come out of the track ROBBiE is placed on. To access the other seven outputs, create a new audio track. Then set Audio From to the track ROBBiE is on. In the box below, select one of ROBBiE’s outputs. Make sure to set the track to Monitor Auto, and arm recording. (You will have to disable Exclusive Arm under Preferences > Record).

Midi Mode⌗
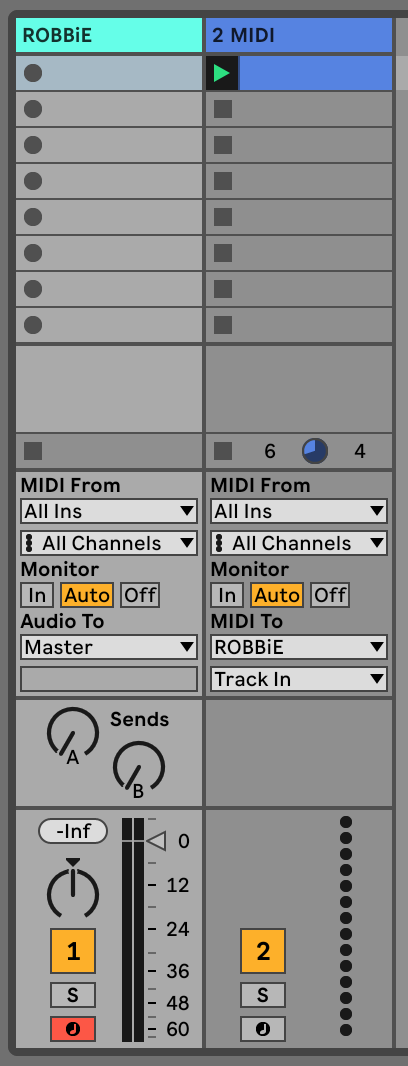
With ROBBiE on an audio track, we have to route midi into it in order to use Midi Mode. To do this, simply set Midi To on any midi track to the track ROBBiE is on, and select ROBBiE from the second box. Make sure to Arm the track ROBBiE is on. (If ROBBiE is on a midi track, that track’s midi can be used to control ROBBiE in Midi Mode.)
Fruity Loops⌗
Many to One Mode⌗
In the mixer, select the channel you want to route to ROBBiE. Click the arrow at the bottom of the channel ROBBiE is on. A green wire will appear from that channel to ROBBiE. That channel is now a possible input to ROBBiE. Repeat this for all channels you want to route into ROBBiE. At the top of the plugin window there is a gear, click that, then click the plug and gear icon to go to the plugin settings. Under processing, you will be able to map ROBBiE’s eight inputs to any of the inputs you routed with the green wires.


One to Many Mode⌗
In the mixer, select the channel ROBBiE is on. Use the arrows on the bottom of the mixer channels to add outputs to ROBBiE. If there is a green wire coming from ROBBiE to the channel you’re routing into, you’ve added that as an available output. At the top of the plugin window there is a gear, click that, then click the plug and gear icon to go to the plugin settings. Under processing, you will be able to map ROBBiE’s outputs to any of the outputs you routed with the green wires.


Midi Mode⌗
Click the gear at the top of the plugin window. Then, click the plug with gear icon. Under settings you will be able to choose the midi channel to route into ROBBiE under Input Port. (You can create a generic midi track using the Midi Out in the Channel Rack.)
Logic Pro, Pro Tools, GarageBand⌗
ROBBiE does not work with these DAWs, and due to restrictions in them around bus layouts, probably never will. Sorry!
Development Notes⌗
The initial inspiration behind ROBBiE’s development came from the Namco N163 sound chip. One of the limitations of this early device was in its mixing. The chip can’t truly mix between multiple channels at once, so instead it pulls a neat trick called multiplexing, where it rapidly cycles from one channel to the next. This made me wonder what kind of sounds could be found with a multiplexing plugin? It turns out this makes a pretty nice samplerate reduction / bitcrush type effect, but it’s not varied enough to really get a lot of use. However, the plugin did turn out to have some interesting uses at slower rates! So I left the bitcrush effect in as the ultra high settings on the free rate, and instead modeled the plugin after sequential switches (which are sort of like slow multiplexing!).
Software v1.0.0
Manual v1.3