Gemini Manual
Table of Contents
Overview⌗
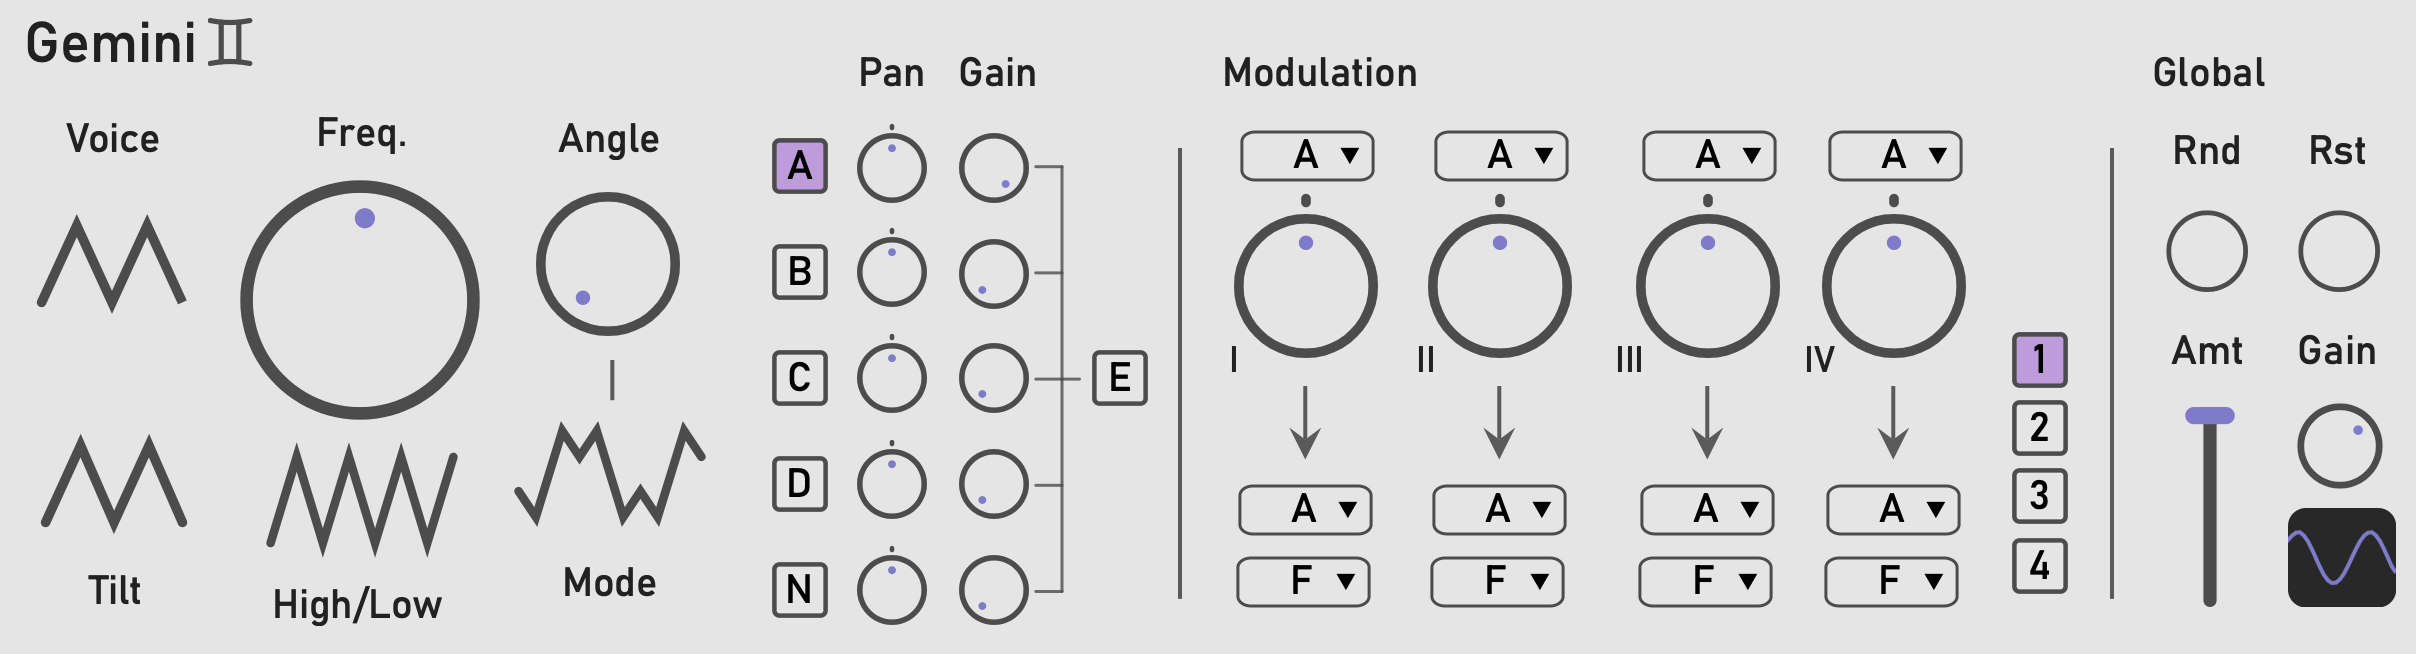
Gemini is a chaotic synthesizer Max for Live Device, featuring four identical waveshaping oscillators, a looping noise section, an envelope, a deep modulation matrix, and randomization.
The modulation matrix is at the heart of Gemini, allowing for chaotic patching, feedback systems, generative output, emergent behaviors, and strange interstellar communications.
The whole is more than the sum of its parts, and this machine has a mind of its own.
Installation⌗
The M4L Device can be used on any audio track simply by dragging the Gemini.amxd file onto that track.
However, if you want Ableton to remember where the device is located, you must add it to your User Library, located in the leftmost panel.
Simply drag the Gemini.amxd file into the user library.
I recommend making a folder to store your M4L devices in by right clicking and choosing New Folder.
You can organize this space how you like!
Uninstall⌗
If you added Gemini to your User Library, simply right click on it, and choose Delete.
Oscillators⌗
Gemini features four identical oscillator engines labeled A, B, C, and D.
The oscillator uses a sine wave as it’s core.
By combining the voice, tilt, and waveshaping controls, many types of waveshapes can be gained.
It is also possible to set the core frequency, and an overall high/low frequency for modulation purposes.
All of the oscillators are valid modulation sources.
Freq and High/Low⌗
These two controls set the base frequency of the oscillator.
In High mode the oscillator will be audible.
In Low mode the oscillator will go very slowly, and therefore be inaudible.
This is known as a Low Frequency Oscillator or LFO, and is useful as a source for modulating other controls.
This will be covered more in the Modulation section.
Angle and Mode⌗
Angle controls the amount of waveshaping applied.
Mode controls the type of waveshaping.
The default mode is “mirroring” where the wave “reflects” off of the top and bottom.
The second mode is “wrapping” where the wave wraps over and under the top and bottom.
The mode control visually shows what each mode does.
This control adds more harmonics or “edge” to the sound.
Voice⌗
The voice control chops the top off of the waveform, creating a trapezoid, and eventually a square wave.
This is the same as hard clipping the waveform. Turning this control up and down shows how it works.
Tilt⌗
Tilts the waveform into either a saw or a ramp style wave. Adjusting this control shows how it works.
Noise⌗

Labelled “N”, the looping noise source generates a small buffer of random noise, which can be regenerated at will.
It offers control over the size of the buffer to be played back, as well as the playback speed.
The looping noise is fed into an optional Sample and Hold circuit, which has adjustable frequency with Low Freq mode.
The noise generator is a valid modulation source.
Regen⌗
This refills the noise buffer with a new noise loop. This is most noticable when using a small loop size.
Freq and Size⌗
Frequency controls how fast the noise is played back, faster playback leads to a higher sounding noise.
Size controls the size of the noise buffer. A small enough buffer leads to a noisy pitched sound.
Sample and Hold, Freq and Range⌗
S&H takes a snapshot of the continuous noise signal on a recurring basis.
Turn the toggle on to enable Sample and Hold.
Frequency sets the rate at which those snapshots are taken.
Range sets the frequency range of the S&H similar to the Oscillator range.
The high range is audio rate, and the low range is inaudible, mostly useful as a modulation source.
Envelope⌗
Labelled “E”, the built in envelope controls the overall volume of Gemini.
By default, it is activated by midi input to the device.
In this case it acts as a typical ADSR envelope.
If Loop is turned on the envelope goes into self-looping mode.
In this case, the R segment is disabled, the A and D segments control rise and fall time, and the S segment adds a base offset to the envelope.
The envelope is a valid source for the modulation matrix.
Trigger⌗
This button manually triggers the envelope.
Pressing and holding allows you to hold the envelope on at the sustain level.
Loop⌗
Sets the envelope to automatically loop repeatedly. Turning this on disables the R (release) control. Set the S (Sustain) control to maximum to have the device drone forever.
Scope⌗
Allows you to see what the envelope is doing!
ADSR⌗
With Loop turned OFF⌗
- Attack: How long it takes the envelope to increase to its maximum when the key is pressed.
- Decay: How long it takes to decrease to the Sustain level once the attack portion is over.
- Sustain: What level the envelope will sit at while the key is held.
- Release: How long to go from the Sustain level, to the minimum once the key is released.
With Loop turned ON⌗
- Attack: How long it takes the envelope to get to its maximum.
- Decay: How long it takes the envelope to get to its minimum.
- Sustain: Offset added to the envelope. Turn this all the way up for a drone.
- Release: Disabled.
Pan and Gain⌗
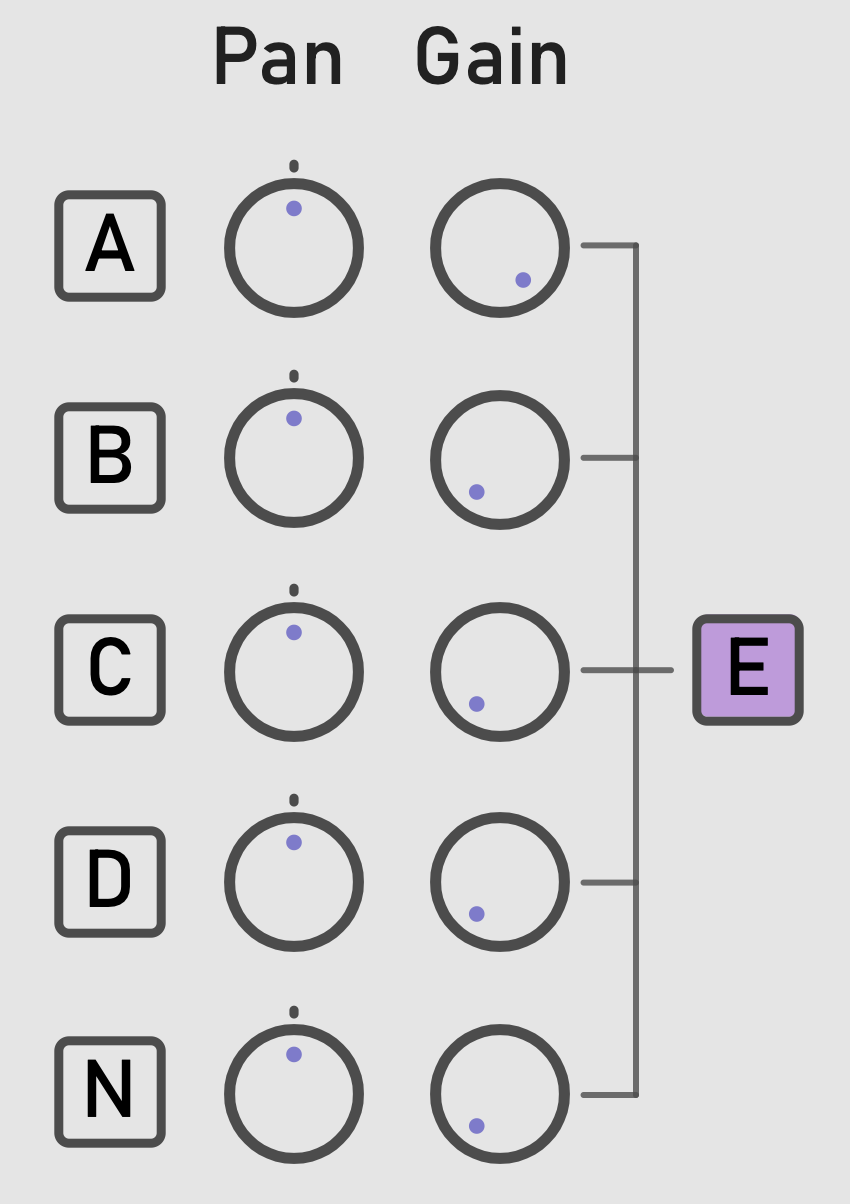
Manually turn the volume of each of the noise sources up and down independently, or pan them left and right.
Each of the gain stages is also a Low Pass Gate, meaning at low volumes they apply a small amount of low pass filtering.
The effect of this is that quiet sounds are “duller”, a phenomenon we see in acoustic instruments as well!
Modulation Matrix⌗
Sends Signals to Controls, controlling them automatically while the synth plays.
This is the “beating heart” of Gemini.
You can think of this as using one signal to automatically turn a knob in Gemini.
For example oscillator A could turn the pitch knob on oscillator B. This is called FM synthesis.
Adding to this, we might have oscillator B control oscillator A’s freqeuency. Now we have feedback!
This is known as XFM or Cross-FM.
How it Works⌗
There are four pages of modulation, denoted by the four toggles on the bottom right, labelled 1,2,3,4.
The modulation routings are set up in four columns per page, labelled I, II, III, IV.
Starting from the top of the column, is the Source dropdown. This contains the letters A,B,C,D,N,E.
These stand for the four Oscillators (ABCD), the Noise Source (N), and the Envelope (E).
This selects the Source of the modulation.
The knob controls the amount of modulation that is passed from the Source to the Destination.
After the arrow, the next dropdown menu is the Modulation Destination.
These are labelled A,B,C,D,N,1,2,3,4.
These stand for the four Oscillators (ABCD), the Noise Source (N), and the four Modulation Matrix pages (1234).
The dropdown below determines which parameter on the selected Destination will be modulated.
These are different based on the type of Destination selected.
For example, you might choose Freq or Angle for one of the Oscillators.
The Noise Source includes Size and Regen as Destinations.
Meta Modulation⌗
The four Modulation Matrix Destinations allow for Meta-Modulation.
These are the Destinations labelled 1,2,3,4 and I,II,III,IV.
They allow for a Source to control the gain knobs in the Modulation Matrix.
For example, say Modulation I on page 1 was mapping Oscillator B to Oscillator A’s Freq for a vibrato effect. You could then set Modulation II to map Oscillator C to Destination 1, I.
Then, Oscillator C would control the amount of vibrato being applied at any given moment.
Global⌗
Random and Amount⌗
Random sets almost all of the controls throughout the device to a random value.
Amount sets the maximum amount of randomization that will be applied.
Hitting the random button with the amount turned low applies to small tweaks to the current patch.
Hitting the random button with amount turned high leads to a completely randomized patch.
Reset⌗
Sets all controls back to their defaults.
Main Gain and Scope⌗
Main gain sets the main output gain of the whole device.
The default setting is 0db.
You can add extra gain, or turn the gain down to nothing.
The scope shows a moment to moment picture of the main output of the device.
Mapping⌗
All of the controls are mappable within Ableton using automation, midi and key mapping, or LFO and other tools.
There are a lot of mappable controls, so the easiest way to find the one you want is by moving it in Gemini and seeing which one pops up in the automation window.
Requirements⌗
Ableton Live 10+ Suite/Standard with Max for Live